How to Map Your Parking Lot, part 4: People and Placements

This is the final post in a four-part series that gets into the weeds of how to set your parking lot up for success. We’re looking at mapping from zones to cones and people to placement, using a recent campus launch as a real-life example.
Well kids, we started from the bottom and now we’re here. We’ve figured out where certain groups park, we’ve determined ingress and egress, and we’ve put signs and cones in strategic places. Now it’s time to factor in our people.
Your parking team volunteers will make or break your parking strategy. They help interpret signage and directions. They guide people to the exact spot that’s set aside for them. Their presence (or lack thereof) can either calm or ramp up a first-time guest’s nerves.
(As an aside, that’s why it’s so important that your parking team volunteers know the plan and execute the plan. It’s why you as a leader must let the parking team speak into the plan (after all, they’re on the front lines and they know what works better than you do). And it’s why they can’t just see themselves as dudes in dorky orange vests. If the sermon starts in the parking lot, they’re going to be the first preacher our guests encounter.)
Here’s how we think about people placement in the parking lot:
Step 1: prioritize your positions.
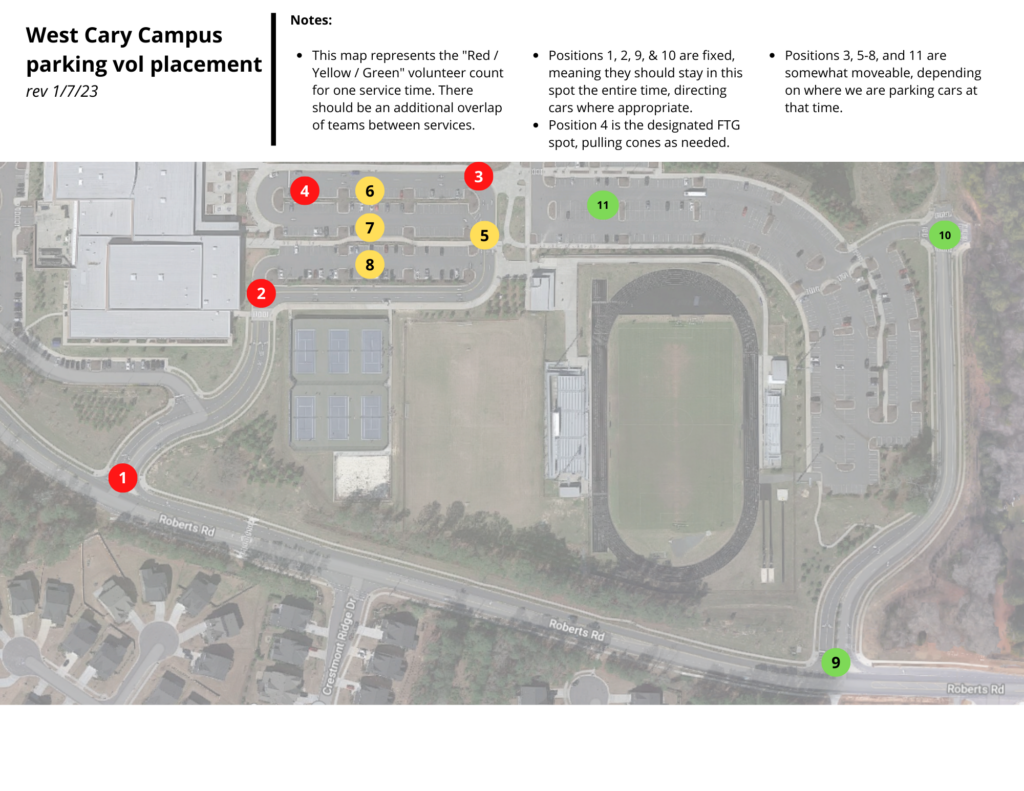
We break all of our teams down into “Red / Yellow / Green” positions. As you can see on the map below, positions 1-4 are red. This is the minimum number of volunteers we can have in the lot. If we don’t have four in this particular lot, we may as well close up shop, because we can’t effectively park cars with less than that. The yellow positions represent our average numbers. On a typical Sunday with typical attendance, this is the comfort level. Green positions represent those that are nice to have if we have the numbers.
Where does the priority come in? Well, we’d never put a #11 in the staff and volunteer lot if we don’t have a #1 at the main entrance. If a few team members call out sick, we can glance at the placement map, and know how to shuffle the deck to get the most crucial positions covered.

Step 2: think “fixed” vs. “flexible.”
Again, using the map above, we have a few spots that are fixed. In other words, the person in that position rarely moves. #1 is fixed: that’s the spot at the main entrance to help guests know they’re turning in the right place. #4 is fixed: they’re always at the first-time guest parking area to pull cones, greet guests as they exit their cars, and encourage them to drop by (or better yet, walk them over to) the first-time guest tent.
But positions #3, 5-8, and 11 are flexible, depending on where we’re parking cars at that particular time. They may end up in multiple areas throughout the morning, guiding people away from one lane and towards another, directing a specific car to a specific spot, etc.
How do you know if a spot is fixed or flexible? Look at step 2 on this post, where I talk about those crucial turns or confusing intersections. If there’s a chance that a guest can get confused on direction, that’s likely a fixed spot.
Step 3: remember your skeleton crew.
We preach all the time about the importance of a skeleton crew: a small percentage of your Guest Services Team who remains in place throughout the morning, so a guest can see a person no matter what time they arrive.
Your parking team is a crucial part of your skeleton crew, especially if we risk promising a “wow” that doesn’t deliver.
Most of the time, a 2-3 person skeleton crew is sufficient. Using our current example facility mapped out above, position #1 and #4 would suffice. #1 remains in place throughout the service. They can actually stop incoming traffic – since it would just be a random car here and there – and give them specifics on where to park. Then they can radio ahead to position #4 and tell them that a car is incoming. (For the record, there are also Sundays we get by with just position #1, and we hand a radio to the first-time guest tent team, who functions as position #4. But some of this depends on the size of your lot and how far you’re asking those ladies to sprint. 🙂 )
If you’re a true-blue parking nerd (and I’ve heard from a few of you…insert secret handshake here), I hope this series has affirmed some things you’re already doing. If you have never thought about what parking would / should / could look like for your church, I hope that these steps have been simple enough that you know how to get started. If you need a little help or coaching or just want to nerd out together, I’m happy to do it. Let’s set up a time to talk.
See all posts in the series:
- Part 1: Creating Zones
- Part 2: Ingress and Egress
- Part 3: Signage and Cones
- Part 4: People and Placements
Photo credit: Jonathan Bullock
