How to Map Your Parking Lot, part 1: Creating Zones

This is the first of a four-part series that gets into the weeds of how to set your parking lot up for success. We’re looking at mapping from zones to cones and people to placement, using a recent campus launch as a real-life example.
Ah, the lowly church parking lot.
It’s a place of fender benders and door dings, a place of high efficiency or low-key anxiety, a spot for a great first impression or a lasting sense of confusion.
Too often, churches don’t put enough thought into the lot. After all, “We provide the lot…can’t the people just figure it out?”
Well…yes. And…no.
If we really believe the sermon starts in the parking lot, then we should spend at least as much time thinking through the lot – even if it’s just a “one and done” thinking it through – as our pastor does in sermon prep each week.
In this short series, I’m using a recent campus launch as a jumping-off point to show you how we think through parking lots at both permanent and portable facilities. In the case of this particular campus, we’re meeting at a local high school.
Now, this lot I’m using as an example might be far bigger or far smaller than what you’re dealing with. But I’m choosing this facility for a particular reason: we didn’t get to choose the parking lot. We don’t get to pour new asphalt or rip up curbs we don’t like. And maybe that’s what you’re facing: you’re in a legacy facility or a rented theater. You have more than you need or less than you want to work with. And that’s the crux of this series: what we have is what we have, so how do we make the most of it?
Step 1: get to know your lot

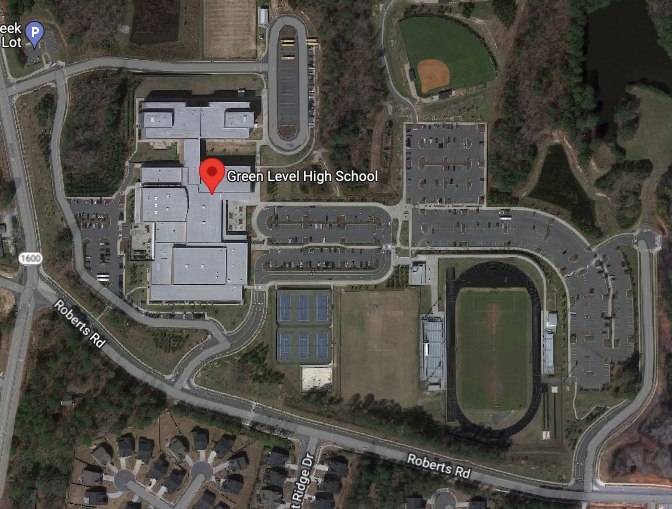
This is a Google Maps screenshot of the campus in question. One of the first things that I do when laying out a lot is to look at what we’re dealing with. I want to know key info like the number of entrances, the total number of parking spaces (including general parking, ADA, bus parking, etc.), and natural or man-made barriers like curbs, sidewalks, or green spaces. I also want to get a feel for the typical “local flavor” of traffic patterns: does the surrounding community typically approach the space from one road vs. the other, are there hidden entrances that serve as a badly-kept secret, etc.
Getting to know the lot involves studying the map, but it also necessitates a walk-through and drive-through…and sometimes several of them. In this case, I did both, utilizing school hours (with administration’s permission) and holiday breaks to see how the lot feels and fills when full and empty. My rule of thumb is, if I don’t put at least ten miles on the odometer driving in and around the parking lot, I probably haven’t driven it enough to know it well (with smaller parking lot footprints, your mileage may vary, although I did learn to drive at 15 in my home church parking lot, and I did log at least ten miles in a space that parked maybe 200 cars, so hats off to my mom’s 1987 Cutlass Ciera).
Step 2: figure out how much space you need
With a permanent campus, we’re factoring in the size of the lot based on the size of the auditorium. But with a portable facility that we’re renting, those decisions have long been made and are out of our control.
The school we’re in is massive, and the auditorium size doesn’t necessarily correlate to parking lot size. So I knew from the beginning that we wouldn’t need anywhere close to the entire lot, at least to start.
Our rule of thumb for parking spaces needed is projected attendance divided by two. Another way of saying that is two people per car. I’ve seen studies for church parking that range anywhere from 1.4 to 2.7 people per car, so we split the difference and make it easy math. (See more in point 1 of this post.)
Step 3: determine what (and who) you’re accommodating
I cover the six parking areas your church should consider in this post, but for this particular campus we knew we needed to accommodate four areas: first-time guests, handicapped / special needs, staff and volunteers, and general parking. But because this is a mobile campus that requires set up and tear down, we also had to factor in three 24′ trailers and loading space for each.
Once I had those puzzle pieces accounted for, it was time to decide where they actually go. (Now, in full disclosure, this is always a chicken-or-egg situation: sometimes the layout of the lot determines the areas I accommodate, and sometimes and areas I need to accommodate forces me to rethink how I’d position the lot.)
Step 4: map your zones

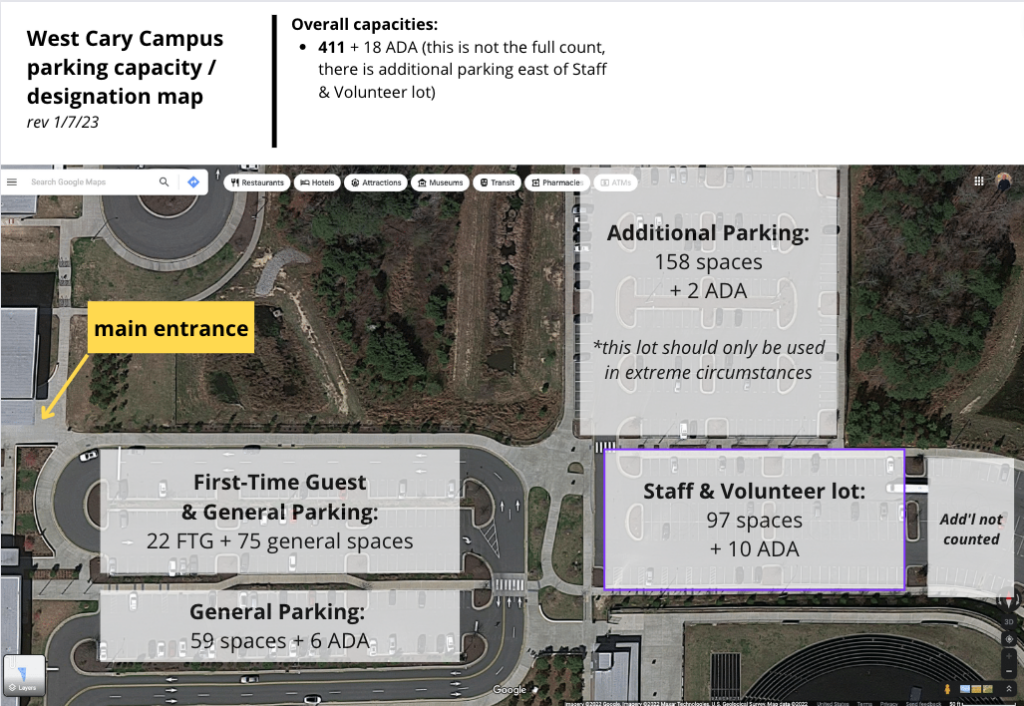
As you can see on this marked up map, we went with the parking area directly in front of the school for our first-time guest, ADA, and general parking. The staff and volunteer lot is separated by a concrete median and sidewalks, and requires a separate entrance to the facility. On the top part of the map is an additional parking area, which we don’t plan to utilize for several months. And this isn’t showing even more additional parking (to the east) and our trailer lot behind the school (to the west).
Next up in the series: how to map entrances, exits, and traffic flow
See all posts in the series:
- Part 1: Creating Zones
- Part 2: Ingress and Egress
- Part 3: Signage and Cones
- Part 4: People and Placements

Parking is my Guest Experience love language, and Danny is THE MAN delivering this gem.
I knew the percentage of the human population that would appreciate an article like this is very small indeed, but I also knew there would one be one person at the top of the appreciation pile! You can’t hide traffic nerds. 🙂